Search The Inn

Thursday, December 19, 2024

Digitrax Christmas & New Year Holidays 2024

Digitrax will be closed the week between Christmas and New Year's Day so we can enjoy time with our families and friends.  We wish everyone a Wonderful Holiday Season, a Merry Christmas and a Happy New Year!  We will close at 5:00PM CT on Tuesday December 24, 2024 and reopen on Thursday January 2, 2024.


If you have an idea for a blog post here, let me know. If I can comment on it, I will or I'll see if someone else can and post it  

Friday, December 6, 2024

LokSound 5 Change Horn On-The-Fly Via Function Key

As any DCC and Sound model railroader knows, you program your decoder by changing CVs (configuration variables) to have the sound you want to hear when you press a particular function. That's the way it has been since sound decoders became a thing. If you want to change a particular horn on an engine you have to either reprogram it (change the CV contents) on a programming track or do what is called Program On The Main (POM). On most club layouts POM is often frowned upon.

Enter the LokSound v5 sound decoder. It has the ability to change horns on the fly by repeatedly pressing a user assigned function key. Actually, you can change several different sounds this way but this discussion will demonstrate changing horns. We will use the S0523 sound file for this exercise.

Once you have the sound file loaded click on the decoder pane on the left and then click on the Sound Slot Settings sheet. In the right window you now have the SoundCV Configuration with the Sound Slot Configuration below. Notice that SoundCV 9 is labeled Horn. This is the CV we will be manipulating. See figure 1.

Figure 1 SoundCV Configuration

SoundCVs were added to allow the user to make changes to certain sounds and not have to rewrite the entire sound file to the decoder. You just Write Decoder Data from the menu. They also are accessible when programming in the Sound Pane when working with sound slots and that is the key to this exercise. If you've never programmed with the LokProgrammer the author highly recommends you complete this exercise first. It will show you how to create a sound slot which is what this exercise is going to accomplish.

Let's start by changing to the sound pane and then double click on sound slot 2 because it's empty. Under Sound Slot properties name this slot Horn Select (or whatever you want). Next click on State twice and arrange them as shown in Figure 2. Next add four Transitions and arrange them as also shown in figure 2. This is the basic layout. If you haven't completed the exercise mentioned above you won't understand how to or what you're doing here.

Figure 2 The basic layout

Conditions and Actions
These are what guides the logic. Click on the transition between Mute and State. In Conditions select Function and set it equal to true. In Actions select user1 and set it equal to 0. Now click on the upper transition between State and State(2). In Conditions select Function and set it equal to false. In Actions select timer1 and set it equal to 5. This is the start of the double click loop that will change the value in SoundCV 9.You Should now have figure 3.


Figure 3 First Conditions and Actions

Now for the lower transition. Select it and in Conditions select Function and set it equal to true. In Actions select User1 then "+" and set the value to 1. This is shown in figure 4.
Figure 4 Closing the Loop

These two states allow you to double click the selected function button repeatedly and the value of u1 will increment by one everytime. Now for the exit condition of the sound slot. Click on the bottom transition of State(2). In Conditions add 2 different ones. First, Select Function and set it equal to false then select Timer1 and set it equal to 0. In Actions select SoundCV9 and type in user1 for the value. This is probably a bug in LokProgrammer's software because you get no dropdown for any SoundCV selection but it will accept a typed in value. Results are shown in figure 5. Lastly, turn on looping in both states since exit conditions are not allowed in non-looping sound states.


Figure 5 The Exit Conditions

Finally go to the Decoder Pane, Function Mapping sheet and assign your Horn Select sound slot to an empty function key.
The author recommends you save this to your template files and then run it in the simulator. Double clicking the assigned function key will increase the user1 variable value for every click except for the first double click. This allows resetting the horn to the beginning value. When you stop clicking, the value is assigned to the SoundCV9 variable thereby changing the selected horn.

Recommendations
When you look at the horn packs for engines some of them contain a lot of horns.

Starting Point
Let's say we like horn #10 of a 16 horn pack. So you want it to start there when you increase the user1 value. Change the initial transition from user1 = 0 to user1 = 10. However, this will prevent being able to select any of the first 9 horns.

Safety Factor
In the lower transition to the left of state(2) it may be advisable to put a second condition of user1 < x where x is some number greater than 1. As is, double clicks will just continue to increase the value until the user stops clicking. If you go beyond the last horn in the pack, who knows? The x should be 1 less than the maximum value you want because u1+1 will increase the value on exit.

Rearrangement
You could rearrange the order of horns in the horn pack but that would be a ton of  work.

This is a simplified version of changing horns inspired from an exercise by Apoorva, the Indian Rail Modeler. He has a YouTube video on this here.

The author is sure you can come up with other things to make this better. Most of all have fun!


If you have an idea for a blog post here, let me know. If I can comment on it, I will or I'll see if someone else can and post it 

Sunday, November 24, 2024

LokSound Momentary Function Keys For Power Cab

A member of the groups.io forum emailed the author and included an interesting sound slot file that simulates a momentary button for the Power cab. He wanted to know if it could be put on the Hostlers Inn blog for use by the readers that also have Power Cabs. He could not remember for certain but he believed that Dave Heap was the one who originally came up with this. It is fairly simple and it does work. See figure 1.


Figure 1 The momentary Function

All the user has to do is create a sound slot file (a tutorial for doing this is located here) and recreate figure 1 in that sound slot. Once completed, copy the function file to your LokSound Templates folder for future use. Assigning that sound slot to a function button on the Function Mapping sheet gives that button the functionality.

Figure 2 shows the Action Container. This is where the actual sound is accessed. In this case it is solely a simple bell ring that demonstrates sound placement.


Figure 2 The Action container

This could be as complicated as the Grade Crossing Signal that was discussed here

This is another exercise in utilizing user variables along with creating simulated momentary buttons for the Power Cab.


If you have an idea for a blog post here, let me know. If I can comment on it, I will or I'll see if someone else can and post it 

Tuesday, November 12, 2024

LokProgrammer Software 5.2.10 Released

From the ESU Website:

User Interface: in the function mapping, the sound slot number will be shown in brackets

SignalPilot: Updated signal aspects for all lighting effects that are using "Enable function timeout" to fix a problem with turn on / off

New firmware 5.12.176 for LokPilot 5 and LokSound 5 family: 
  • New output mode for servo-outputs: 
    • Servo Pantograph bouncing
    • Light effect Servo output 

Johnson Bar control improved
    • Now Pos A is approached when requested speed > 0 and forward, Pos B when requested speed > 0 traveling backward
    • When the locomotive is stationary, the center is approached 

Bugfix: SUSI mapping

Available here.


If you have an idea for a blog post here, let me know. If I can comment on it, I will or I'll see if someone else can and post it

Saturday, November 2, 2024

Atlas' Scale Product Archives

For those who may not know, Atlas has a website that records all of their produced product types (Master, Trainman, etc.) and scales (O, HO, N, etc.) for research or informational purposes. The author has used this many, many times to give him some idea of what he just bought at that last estate sale or swap meet. 

It is located here

If you are wondering how old that car is that you just bought, and you know it's an Atlas, check it out.


If you have an idea for a blog post here, let me know. If I can comment on it, I will or I'll see if someone else can and post it

Wednesday, October 9, 2024

Flatcars From Accurail!!... Not Anytime Soon


The author recently emailed Accurail (original website and new website) concerning the possibility of their adding flatcars to their line of products. He received a comprehensive reply today from one of the production managers thanking him for the email and giving apologies. He stated that flatcars were the most requested item and there had been discussions about manufacturing them. 

Unfortunately their head toolmaker (one of the Accurail owners) passed away earlier this year and there is absolutely no way they could afford to hire a full time toolmaker at present.

So, there you have it. That is the reason there are no flatcars in their lineup. It will probably be a while before we see new tooling from them at all. 

It is the author's belief that the Accurail line of products, most importantly at their price point, allows the new hopeful young model railroader to enter the hobby at an affordable level. As most, if not all, of you know, at the current price of new rolling stock ($40 and up) and passenger cars (anywhere from $45 to $120 or more) it is a difficult (read as expensive) hobby the get into. Don't even bring motive power costs into the conversation.

Let's hope (with the recent closing of manufacturers, brick and mortar hobby shops, etc.) Accurail continues to produce their products and we continue to get younger modelers into the fold.


If you have an idea for a blog post here, let me know. If I can comment on it, I will or I'll see if someone else can and post it

Friday, October 4, 2024

Scale Trains Helping With Hurricane Helene Relief

Scale Trains has implemented help for Hurricane Helene Relief and is partnering with various organizations for North Eastern Tennessee and other locations help. If you wish to contribute or help, read about it here.

If you have an idea for a blog post here, let me know. If I can comment on it, I will or I'll see if someone else can and post it

Tuesday, October 1, 2024

From Model Train Stuff

We're Still Here For You
Continuing to Serve Despite
Hurricane Helene
Dear Valued Customers,
We hope this message finds you safe and well. As you may know, our physical location in the Asheville, North Carolina area was recently impacted by Hurricane Helene, and the aftermath has created significant challenges for our team. Beyond the operational disruptions of power outages and flooding, many of our employees are facing incredibly difficult personal circumstances—some are without power, cell service, food, clean water, and basic necessities.

Despite these overwhelming challenges, our team is doing everything they can to get back to work and continue fulfilling your orders. However, due to these extraordinary conditions, we kindly ask for your patience as shipping times for certain orders may be longer than usual. Rest assured, we are working closely with our partner warehouses outside of North Carolina to ensure that orders are processed and dispatched as quickly as possible. Even through these challenging times, our goal remains to serve your model railroading needs with the dedication and care you’ve come to expect from us.

Now more than ever, your continued support is crucial. Every purchase you make helps to provide much-needed resources for our employees and their families during this tough time. Your loyalty makes a real difference, and we are deeply grateful.

We are committed to delivering the quality products and service you’ve come to expect, even as we navigate these unprecedented hardships, and we'll have more updates to come in the near future. Thank you for standing by us and supporting our incredible team as they work through this crisis.

Please feel free to reach out with any questions or concerns. Our customer service team is available, and they can be reached at 828-341-2295.

Stay safe, and thank you for being part of our community.

Warm regards,

The Model Train Stuff Team

If you have an idea for a blog post here, let me know. If I can comment on it, I will or I'll see if someone else can and post it

Thursday, September 26, 2024

Loksound Equipped Engine Refuses To Move But Sound Is Fine Updated 2024-12-01

This problem has plagued users for a long while now and is almost constantly an issue brought up on the LokSound groups.io forum. Guaranteed you'll see it brought up about every two or three days.

There are several reasons this could happen and the majority of them are easily remedied. There is a list of things that need to be checked and these are mentioned whenever the problem pops up. 

  • Make sure Drive Hold is not on
  • Insure the Independent Brake is not on
  • Insure the Automatic (Train) Brake is not on
    • To learn how to implement the Train brake read this
  • Make sure CV19 is set to 0 (not in advanced consist)
If group members think of other things that need to be checked, email the author and he'll add them to this list. 

Recently, the author came across this problem in a couple of his locomotives and it always occurred when initially programming the decoder. It didn't matter if the engine was programmed from scratch or was a copy of a previously programmed engine with just the engine number changed. It happened in both instances and was always for a v5 decoder (that's what the author has) so, both 21 pin and micro decoders developed the problem.

Definition of Terms
Just to be clear, the following was done with a LokProgrammer and not JMRI. Also, with a LokProgrammer there are some terms used in this discussion that may be confusing for those used to JMRI, Panes, Sheets and Driver's Cab. 
  • Panes are the columnar selections on the left side of the LokProgrammer window. They start with Driver's Cab at the top and end with Sound at the bottom. Directly to the right of the Panes are the Sheets starting with Address. See figure 1. 
  • Sheets give you access to the individual CV settings of the decoder but they can also give you access to other things such as the individual sound slots on the Sound Pane. It depends on which Pane you select. It  takes a little getting used to.
  • Driver's Cab is a built in throttle which allows you to immediately test the changes you have made to CVs after Writing Decoder Data. It does not allow you to test any changes you have made to the Sound Pane though. Some changes there have to be burned to the decoder to hear them (the Simulator in the sound pane will allow hearing some changes but not all of them and that is beyond the scope of this discussion).

Fig 1 Panes, Sheets and CV access

Now For The Insidious One
Re-burning the unchanged original downloaded file from ESU (pure factory reset not a reset to previosly programmed values) would clear up the problem so what did the author change that caused this? 

Today it was decided he was going to take the time and trace the cause. One sheet at a time utilizing the Driver's Cab to test if the engine is running or not after changes and then go changed setting by changed setting on the particular sheet if the problem occurred.

This took some time. Brake Settings, Driving Characteristics, the various Function Sheets, all were fine. Motor Settings, WAIT!!! the engine refused to move!!! Now change by change until the author got to Motor Overload Protection. Long story short finally, checking the Enable motor current limiter would prevent the engine from moving!  See figure 2.


Fig 2 Motor current limiter

Think! Why? This was an older HO KATO AC4400CW purchased at a swap meet and it had the same changes made to a new one that was working. This makes perfect sense. The older motor needs more current than the new model and the protection wouldn't let it move because it was above the set limit.

Uncheck the Enable motor current limiter box, test, engine moves! Problem solved. Perhaps in the future (when there's time) some experimentation with this setting will show what's going on.

Don't forget this one after checking Drive Hold and all the different brakes don't fix the problem. Also remember that if after all of these checks are done and the engine still does not move, you probably have a blown drive circuit in the decoder and it requires a trip to Colorado for a fix. Remember that the ESU office has moved. It's no longer in Pennsylvania. 

I hope this helps and I know it demonstrates what lengths you sometimes have to go through to isolate problems. Good luck!


If you have an idea for a blog post here, let me know. If I can comment on it, I will or I'll see if someone else can and post it

Wednesday, September 25, 2024

Digitrax Closed on Thursday 9/26 Due to Hurricane Helene

From Digitrax - Sept. 25, 2024

Digitrax will be closed tomorrow (9/26/2024) as Hurricane Helene heads our way. We're putting our team's safety first with the storm coming in. We aim to reopen on Friday if it's safe. Thanks for your understanding, and we will let you know if anything changes!


  • If you have an idea for a blog post here, let me know. If I can comment on it, I will or I'll see if someone else can and post it

Friday, September 20, 2024

Replacing the Sound Module in a Bachmann Spectrum EM-1 Locomotive.

Need to replace a Bachmann Spectrum EM-1 sound module? Be careful!


Fig 1 Standard 21 Pin Decoders Not Compatible

The key take away here is that standard 21 pin(Soundtraxx Economi, Tsunami2, TCS 21 pin, etc.) are not compatible with the sound module that accompanied the EM-1. One option is to install a Soundtraxx TSU-2200 decoder. How to do this is explained in this video from Soundtraxx.

Another option is to install a DecoderBuddy motherboard by NixTrainz and the 21 pin decoder of your choice.


  • If you have an idea for a blog post here, let me know. If I can comment on it, I will or I'll see if someone else can and post it

LokSound Volume Control Options (There are several)

An excellent discussion of the different ways to control volumes of the various sounds of LokSound decoders took place recently on the groups.io LokSound forum. It started with a user wanting to know the difference between the controls on the Decoder tab and the Sound tab. See figures 1 and 2.

Fig 1 The Decoder tab

Apoorva (better know as the IndianRailModeller) gave a good explanation of the difference and even explained additional ways to control volumes.

The volume setting for a soundslot set from the Decoder tab (figure 1) is like the Master volume control for each soundslot. In the same example, let’s say your Radiator fan soundslot is not very audible. Changing the volume setting from say 60 to 128 under soundslot settings will increase its volume, and the change will be applied equally to all sounds in the soundslot.


Fig. 2 The Sound tab

The volume settings in the window in the bottom right of your second screenshot sets the volume at which each individual sound file plays at when used in any of the sound slots in the sound project. Let’s say you have a Radiator Fan sound slot that uses three sound files, a start sound, a single loop sound and an end sound. The volume of each of the three sound files (typically a 16-bit .wav file) is set in this window. Let’s say you change the volume for the loop sound file from 100 to 150 and leave the volume of the start and end sound files at 100, when you play the radiator fan soundslot, the loop will play louder relative to the start and end sounds. Further, the loop sound will also play at the higher volume setting of 150 if it were used in any other soundslot.

Continuing, Apoorva stated there is in fact a third place where one can change the volume of individual soundstates and sound containers. This is contained within the sound flow of soundstates. Open a soundslot and click on any sound state or container and the menu on the left has a volume setting that one can use to increase or decrease the volume of that particular soundstate or sound container. See figure 3.

Fig 3 Container sound control

He also mentioned that ESU uses this third method of volume control in their prime mover Dynamic Volume Control feature in the most recent versions of their diesel sound projects. They set the volume of the idle sound to a low volume (Volume setting of 50) and each subsequent notch is set to a progressively higher volume, all the way up to 128 for Notch 8. The transition soundstates between notches also step up in volume from the previous notch volume level to the next notch volume level. This gives a more realistic sound transition that many modellers like. Open up the prime mover soundslot and browse around clicking on the various sound containers/soundstates and take a look. 

Apoorva also has a YouTube channel containing videos demonstrating his custom prime mover sounds along with other topics.


  • If you have an idea for a blog post here, let me know. If I can comment on it, I will or I'll see if someone else can and post it

Sunday, September 8, 2024

Announcement From The JMRI Community - 25 YEARS!!

The Java Model Railroad Interface (JMRI®) community announces two major milestones:  the 25th anniversary of the first use of JMRI and the 10,000th update to the Java Model Railroad Interface software used by almost 50,000 model railroad hobbyists for managing and operating today’s digitally controlled model railroads.  With over 300 developers worldwide having contributed, the “community sourced” JMRI project began in 1999 to provide a way for model railroaders to manage the complexity of train engines fitted with digital decoders.  Today, model railroaders worldwide use the greatly expanded JMRI system for everything having to do with the development and enjoyment of modern model trains and layouts.

Bob Jacobsen, a member of the original team and still a senior developer, said “JMRI has helped bring the sophistication of modern electronics and computers to thousands of model railroads - all based on open source software.”  Not only model railroad hobbyists, but millions of people of all ages have seen JMRI in operation at holiday train displays, hobby shows, and train exhibits at multiple museums around the world.


“JMRI was one of the key steppingstones in the wide adoption of Digital Command Control across the model railroading community by making the process of implementation easier, visual, and common across all manufacturers,” noted Peter Ely, a founding member of the NMRA DCC Working Group.  “JMRI itself grew in complementary directions to allow the typical model railroader to do things at the system-wide railway level only dreamed about by the original working group.”

Jacobsen said that JMRI development continues to keep pace with changes in technology and that another 10,000 updates are likely over the next decade.  It is through the continued interest and contribution of time and effort of the community members that JMRI feature are expanded and technology updated.  Interest in JMRI extends over dozens of user forums and social media platforms, with over 8,000 users participating in the primary user forum on groups.io, asking questions and contributing answers and suggestions that are used to expand and improve JMRI capabilities.


Congratulations and thanks to all who have participated in using and improving JMRI, now and into the future.


About JMRI 

The Java Model Railroad Interface project was initially a modest undertaking of some dozen model railroad hobbyists who wanted to bring their computer skills to the emerging field of digitally controlled model trains.  Forming an open source software development project, their first output was called DecoderPro® and provided easy-to-use screens for managing “configuration variables” in the small computers that manufacturers and hobbyists were installing in train engines.  The effort expanded to create PanelProTM with features for controlling all types of electronic devices and automating train operations by monitoring sensors around the layout.

Unfortunately, the community was soon embroiled in a copyright and patent dispute that resulted (after seven years of litigation) in the landmark Jacobsen v. Katzer case that helped establish the legal basis for today’s open software movement. The Electronic Frontier Foundation cites this case as one that has allowed the internet to flourish and find its way into millions of computers in homes, offices, and businesses.


JMRI today provides functions including management of Digital Command Control decoders in train engines, cars, and other devices, graphic display of small and large train layouts, on-line real-time operational monitoring of sensors and other devices, automation of train operations, and management of realistic train operation scenarios.  JMRI also provided the first widespread implementation of the WiThrottle protocol.


New releases of JMRI are made available to users approximately monthly.  JMRI is comprised of several thousand source files available at GitHub, the free open source code repository, and is maintained and expanded by community members.  One of the milestones celebrated today is the 10,000th developer update to the JMRI repository on GitHub, indicating the robustness and on-going development of this important open source project.


  • If you have an idea for a blog post here, let me know. If I can comment on it, I will or I'll see if someone else can and post it 

Tuesday, August 27, 2024

ESU has Moved Offices!

BREAKING NEWS!!

ESU, LLC has loaded up our offices in Pennsylvania, hitched up the wagons, and pointed them west! The journey across the USA was great and we are now getting our new facility set up in beautiful Colorado Springs, Colorado!

Starting on Monday, August 19th ESU, LLC will re-open our US office at this address:

ESU, LLC 3625 Betty Dr., Suite A Colorado Springs, CO 80917

Rest assured that we are committed to continuing to serve all of our dealers and customers in the same high-quality manner that you’ve come to expect from ESU, LLC.

While we set up the new facility during our summer break, we continue to ask that no items be sent in. We will once again accept items at the new facility beginning on August 19th.

--
John H. Reinhardt
  PRRT&HS       #8909
  C&O HS       #11530
  NRail (NTrak) #54979044 (7566)


  • If you have an idea for a blog post here, let me know. If I can comment on it, I will or I'll see if someone else can and post it

Wednesday, August 14, 2024

LokSound v5 Radiator Fans Not Randomly Coming On At Lower Speeds

Making the Radiator Fans Work Randomly At Lower Speeds
Believe it or not, not all model railroaders run their trains around their layouts at 110 mph. The author is one of these individuals and he also had the problem of not being able to get the radiator fans to come on at the lower speeds. There is a logical reason for this but you have to dig down into the sound files to understand what is going on. Let's do that. We will be examining the S0709 Alco 16 cylinder 251C sound file. This discussion will cover the random functions and specifically the one that automatically controls the radiator fans.

The Random Functions
We'll start by looking at the Decoder Pane - Function Settings sheet. At the bottom of the sheet are the random functions.  See figure 1.

Fig 1 Random Functions Settings

The right side shows:
  • The function button (F0 to F31) that should be triggered
    • F11 is the radiator fans default
  • If the Random function should be triggered while engine is stopped, driving or both
  • If the Random function should be triggered only when the prime mover sound is On
  • The minimum and maximum active time when the random function is active 
    • The actual time is computed by the decoder between the defined range
  • The minimum and maximum passive time between two Random Function triggers
    •  This is the "pause", until the same Random function is retriggered
Set these values as you see fit.

The Radiator Fan Sound Scheme
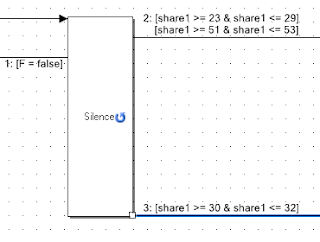
Look at figure 2, the top line where share1 >= 28 and <= 34.


Fig 2 The radiator fan sound slot

If you have followed any of the author's other sound file discussions you'll know that share1 is a shared variable between sound slots in any particular sound file. This condition states that share1 must be between a value of 28 and 34 to turn on the fan. Admittedly there are other conditions, once you understand the first condition the others make sense. The [F = true] condition is automatically taken care of by the random function. So how is this going to help us? Read on.

The Prime Mover Sound Scheme
Now lets examine the prime mover sound slot shown in figure 3.
 

Fig. 3 Notches

The top of the prime mover scheme shows the notch changes from notch 2 to notch 8 and how the share1 value increases as you notch up. Think back to what the minimum value of share1 has to be to turn on the raditor fans, 28. Where does the value get to be at least 28? Not until notch 6. So if you are running your engine at lower notches, the fans will not come on randomly

What do we do now? There are a couple of ways to change things but we will concentrate on one of the easiest.

Now look back at figure 2. Let say we want the fans on when we reach notch 4. The share1 value there is 23. If we look back at figure 2 and we decrease all the values for fan turn on by 5 (28 minus 23) we get figure 4.

Fig 4. Lower speed values for turn-on

Burn the sound file to the decoder and you will have fans on at notch 4 (randomly). 

Loksound v4 decoders did not have random functions and the radiator fans are controlled exclusively by function key on/off (default F11). This also applies to v4 Select decoders.

Now you can see how to adjust things the way you want them. Just experiment until you get what you want. Most of all have fun!!


  • If you have an idea for a blog post here, let me know. If I can comment on it, I will or I'll see if someone else can and post it


Sunday, August 4, 2024

The Different Delay Settings in ESU Decoders

There are two different delay settings in LokSound decoders:


1)  Setting CV124 bit 2 (bit value 4) takes effect only if speed is zero and Sound Slot 1 (prime mover) is off. It's a startup delay that prevents the user from activating prime mover sound and then moving off while the prime mover is still cranking over (because that's how a real loco behaves). It’s not a fixed time value but depends on how long the start-up sequence takes.


2)  Separately, there's a move off delay that takes effect every time speed is zero and prime mover is already running. It prevents the loco from moving off immediately and allows a prime mover spool-up time before the loco actually moves (because that's how a real loco behaves). By default it is set to 3 seconds.


Effect (1) can be enabled/disabled  via bit 2 of CV124.


Effect (2) is a different story:

  • For LokSound V4 decoders, the setting is internal to the Sound Slot 2 schedule (see T1 below, units of 0.25 second). It requires you to have a Lokprogrammer and a copy of the original sound file  as you have to change and rewrite the entire sound project.
  • For LokSound Select decoders, the user can't change it because the Sound Schedule part is laced out.
  • For LokSound 5 decoders, typical projects have moved this setting to SoundCV13 (CV 167). You can change this with your Power Cab or JMRI DecoderPro. (I strongly recommend that you read and write down the original value in CV167 in case the effect is unwanted and you have to revert.


Thanks to Mark Granville of the ESU Groups.io forum for reminding the forum of the differences. This was in response to a question asked.


  • If you have an idea for a blog post here, let me know. If I can comment on it, I will or I'll see if someone else can and post it

Sunday, July 28, 2024

Digitrax Signal Driver Cable Kits (SDCK) 10-pin Connector Source

Some model railroaders use up the 10-pin connectors in Digitrax's kit faster than they use the cable that comes with it. If you need additional connectors search on Amazon.com for:

"PC Accessories - Connectors Pro 50-Pack 2X5 10P 2.54mm Dual Rows IDC Sockets for Flat Ribbon Cable"

As of this post they are around $11.00 for a package of 50. That should last anyone for a while.

Thanks to the groups.io Digitrax forum for this information.


  • If you have an idea for a blog post here, let me know. If I can comment on it, I will or I'll see if someone else can and post it

Wednesday, July 24, 2024

LokProgrammer Software v5.2.9 Released

  • Release notes state:
  1. New firmware 5.10.168 for LokPilot 5 and LokSound 5 family: Improved brightness settings for lighting effect "FireBox".

  2. New firmware 5.10.169 for LokPilot 5 and LokSound 5 family: New feature Auxiliary steam chuff trigger: If enabled, steam chuffs from sound slot 4 will be synchronized using these settings. The feature can be used to independently trigger auxiliary steam motors that could be turned on / off in addition to the prime mover steam chuffs.

  3. New firmware 5.10.172 for LokPilot 5 and LokSound 5 family: SUSI Mapping extended by one line for F0 Reverse to allow for direction depedent control of F0. Needed for some new Märklin Steam locomotives. Addes new output mode (effect) for function outputs: Trigger smoke chuff "Edge Toggle" to be used with latest Märklin / Trix H0 locomotive's synchronized smoke units

  4. SignalPilot: SNCB signals: Addition of two main signals without Shunting light


  • If you have an idea for a blog post here, let me know. If I can comment on it, I will or I'll see if someone else can and post it

Thursday, July 11, 2024

Digitrax DT402D Throttle Encoder Part#

The Digitrax DT402D throttle is getting old and encoders are starting to fail more frequently.

Mouser Electronics and Digikey has replacement encoders. The part# is PEC12R-4220F-S0024. Put this part# in their search bar on the opening page and you'll go right to it.


  • If you have an idea for a blog post here, let me know. If I can comment on it, I will or I'll see if someone else can and post it

Thursday, July 4, 2024

LokSound Ditchlights Alternately Flashing on Horn Sounding

"How exacty do I get the ditchlights on my locomotives to alternately flash when I press the horn function?" 

The author has heard this question a lot including from himself back when he had trouble figuring it out. The answer is it's not that difficult to set up. Once you see how it's done you won't have the problem again.

First, on the Function Outputs sheet in Lokprogrammer for your particular sound file check the Grade Crossing box for both of the ditch light AUX outputs and make a note of which AUX outputs they are. In this example they are AUX1[1] and AUX2[1]. Also, for one (and only one) of the AUX outputs set the Phase Shift setting to somewhere in the low 30's (typically 32). See fig 1.

Figure 1 Checking the Grade crossing box

Second, assign the AUX functions from the first step to the Physical outputs of an unused function. In this example case F6. See fig 2.

Figure 2 Assigning AUX functions

Finally, on the Function Mapping sheet set the F2 Logical function to Grade Crossing. See fig. 3.


Figure 3 Turning on F2's Grade Crossing

The overall affect of these changes is when the ditch lights are turned on they will remain on but steady (no flashing). When the horn is played (F2) they will flash and continue to flash for the Grade Crossing Hold Time setting which is on the Function settings sheet. See fig 4.


Figure 4 Setting Hold Time

<Author's Note>
If the ditch lights are off and F2 is pressed, the ditch lights will not come on nor will they flash.


  • If you have an idea for a blog post here, let me know. If I can comment on it, I will or I'll see if someone else can and post it